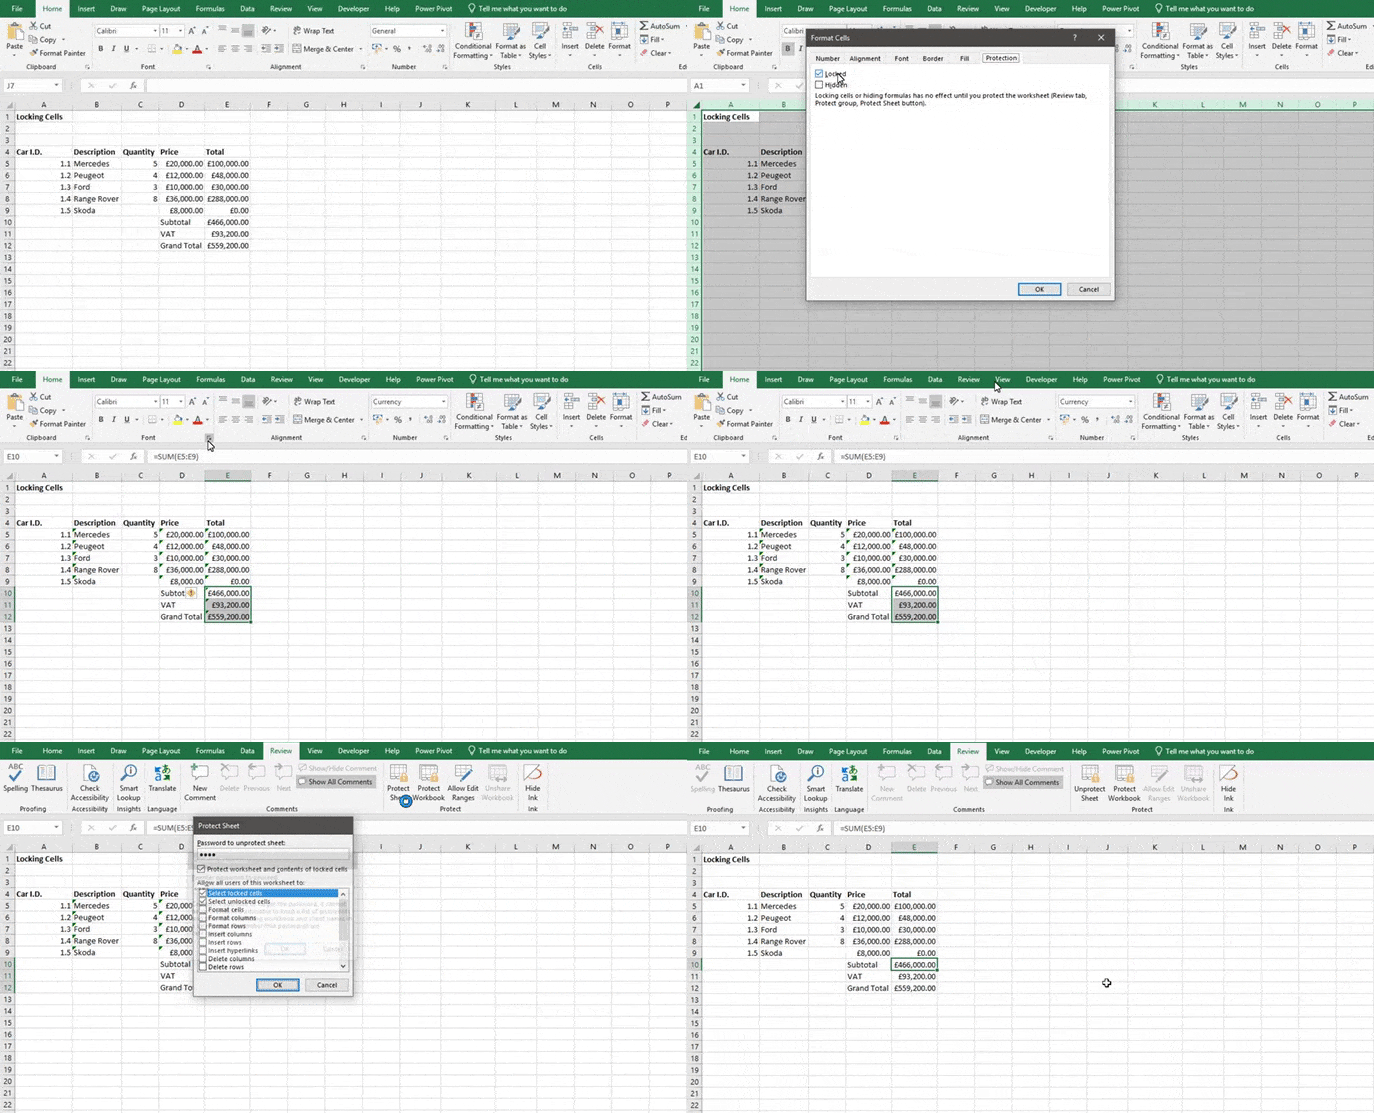
How to lock individual cells?


If there are cells in your spreadsheets that you don’t want people to edit, then you can lock them. To do this follow the steps below.


1. Select your whole spreadsheet


2. Click on the Format Cells arrow


3. Click on the Protection tab


4. Uncheck the Locked box and click OK


5. Select the cells that you want to lock


6. Click on the Format Cells arrow


7. Check the Locked box and click OK


8. Finally protect the worksheet


This will lock the cells you selected earlier.


This content is aimed at the Intermediate level.   Click here to view our course overview.

How to only allow specified cells to be edited?


If you only want users to be able to edit specified cells, then you can use a tool called Allow Edit Ranges. To apply this, follow the steps below.


1. Click on the Review tab and select Allow Edit Ranges


2. Click on New


3. In the Title box give your range a name


4. In the Refer to Cells box, input the cells that you want the user to be able to edit


5. In the Range Password box type in the password that you want the user to type in before they can edit the cells


6. Click OK and then confirm your password


7. Finally protect your worksheet


This should only allow the user to be able to edit the cells that you have specified.


This content is aimed at the Intermediate level.   Click here to view our course overview.

How to lock down a spreadsheet?


If you want to lock down an individual sheet in your workbook then follow these steps.


1. Go to the file tab and select Protect Workbook


2. Click on Protect Current Sheet from the drop down


3. In the Protect Sheet window, type a password


4. Tick the options that you want the user to be able to achieve when the spreadsheet is locked


5. Click Ok


6. Confirm the password and this should now have locked down your spreadsheet so you will not be able to edit it


This content is aimed at the Intermediate level.   Click here to view our course overview.

How to encrypt your workbook?


In Excel you can apply an encryption to your workbook, so no one can access the data unless they know the password. To do this follow the steps below.


1. Go to the File tab and select Protect Workbook


2. Click on Encrypt with Password from the dropdown


3. Type your password into the Encrypt Document box and click Ok


4. Confirm the password and then when you save your work, close your workbook down 


5. Reopen your workbook and it will then ask for a password. To access your work type in the correct password and click Ok


This content is aimed at the Intermediate level.   Click here to view our course overview.

How to protect the workbook structure?


If you want to prevent users from inserting, deleting, renaming, moving, copying, hiding or unhiding sheets then you can protect the workbook structure. To do this follow the steps below.


1. Go to the File tab and select Protect Workbook


2. Next, choose Protect Workbook structure


3. In the Protect Structures and Windows box type a password if you don’t want anyone to turn this feature off, otherwise keep it blank


4. Click Ok. You have now locked the workbook structure


This content is aimed at the Intermediate level.   Click here to view our course overview.